Introduction
Hey there, breakfast lovers! 👋 Remember those lazy Saturday mornings as a kid, the smell of pancakes filling the house? There’s just something magical about pancakes, isn’t there? They feel special, like a little hug on a plate. But let’s be real, sometimes flipping a whole stack can feel like a production, especially when you’ve got hungry tummies waiting (or you’re just craving something quick and easy!).
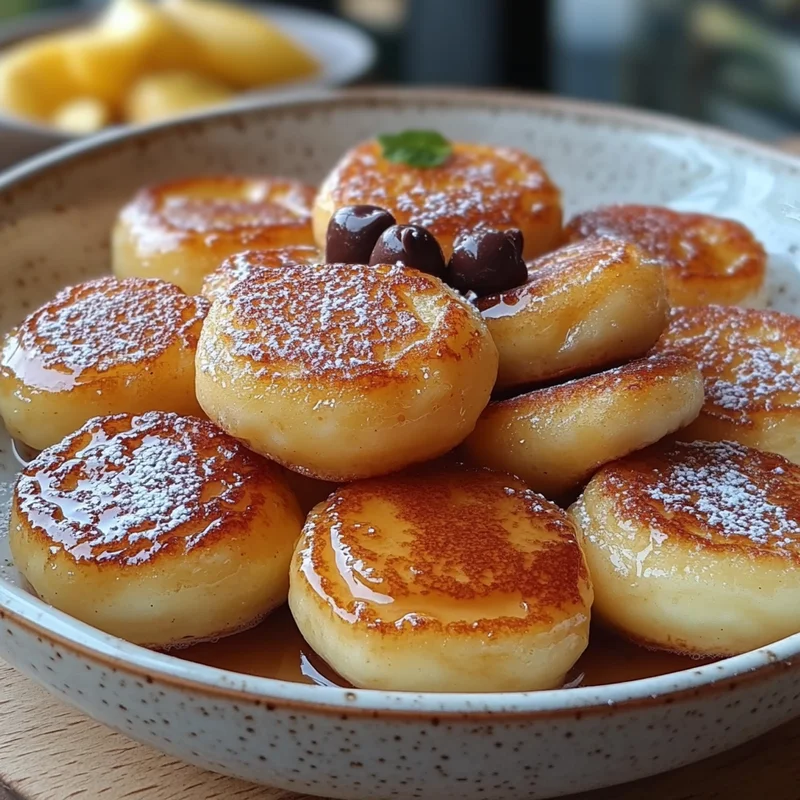
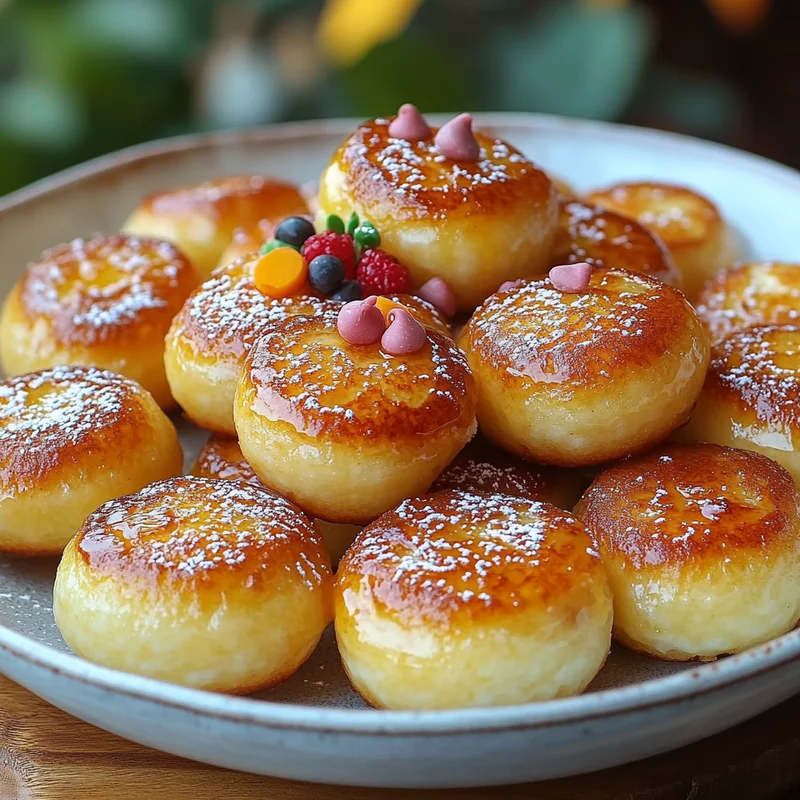
Well, get ready to meet your new breakfast obsession: Pancake Poppers! These little bites of fluffy pancake goodness are an absolute game-changer. They’re SO simple to make, unbelievably fun to eat (hello, perfect finger food!), and frankly, they make breakfast feel like a party. Forget the syrup floods and stack collapses – these poppers are mess-friendly and just begging to be dipped. Trust me, once you make these, you’ll wonder where they’ve been all your life!
Why You’ll Love This Recipe
- Fast: Seriously, the batter comes together in minutes!
- Easy: No complicated steps, just mix and bake/cook.
- Giftable: Pop them in a cute bag for a sweet homemade gift!
- Crowd-pleasing: Kids and adults alike can’t get enough of these fun bites.

Ingredients
Alright, let’s gather our simple lineup! Most of these are likely already hanging out in your pantry and fridge.
- 2 cups all-purpose flour: Your standard pantry staple! Gives our poppers structure.
- ¼ cup granulated sugar: Just enough sweetness to make them feel like a treat, but not overly sweet.
- 1 tablespoon baking powder: This is our leavening superstar! It’s what makes them fluffy and light. Make sure yours isn’t expired for maximum puff!
- ½ teaspoon salt: A little pinch to balance out the sweetness and enhance all those delicious flavors.
- 1 ¾ cups milk: Use whatever you have on hand – whole milk, 2%, even non-dairy works beautifully!
- 2 large eggs: Our binders! They help hold everything together and add richness.
- ¼ cup unsalted butter, melted: Adds that classic, rich pancake flavor and moisture. Melt it gently!
- 1 teaspoon vanilla extract: Vanilla is the secret handshake of delicious baked goods. Don’t skip it!
- ½ cup mix-ins (optional: blueberries, chocolate chips, bananas, or strawberries): This is where the fun REALLY happens! Choose your adventure or go plain. Tiny chopped pieces work best here.
How to Make It
Time to whip up some magic! Making these poppers is a breeze.
1. Whisk the Dry Stuff: In a large bowl, whisk together your flour, sugar, baking powder, and salt. Give it a good whisk to make sure everything is well combined and the leavening is distributed.
2. Whisk the Wet Stuff: In a separate, medium bowl, whisk together the milk, eggs, melted butter, and vanilla extract. Give it a good mix until everything is incorporated.
3. Combine Wet and Dry (Gently!): Pour the wet ingredients into the bowl with the dry ingredients. Now, this is important: Use a spatula or a wooden spoon and mix just until the dry ingredients are moistened. A few lumps are totally okay! Overmixing is the enemy of fluffy pancakes (and poppers!).
4. Fold in Mix-ins (If Using): If you’re adding those delicious blueberries, chocolate chips, or fruit pieces, gently fold them into the batter now. Don’t stir vigorously!
5. Prep Your Popper Pan: You’ll need a special pan for these – think a mini muffin tin, an aebleskiver pan (those round cast iron ones), or even a cake pop maker. Lightly grease the wells of your pan (even if it’s nonstick!) and heat it according to the manufacturer’s instructions or over medium heat if using a stovetop pan.
6. Fill ‘Em Up: Pour or spoon the batter into the prepared wells, filling them about two-thirds or three-quarters full, depending on how much they puff. A piping bag or a small cookie scoop can make this super easy and less messy!
7. Cook: Cook for a few minutes on the first side until the edges look set and you see little bubbles forming on top (just like regular pancakes!). The time will vary depending on your pan and heat. Carefully flip them (a toothpick, skewer, or small fork works great for aebleskiver pans!) and cook for another 1-3 minutes until golden brown and cooked through.
8. Serve Warm: Remove the poppers from the pan and serve them warm with your favorite toppings – maple syrup for dipping, a dusting of powdered sugar, whipped cream, or fresh fruit!
Substitutions & Additions
Here are a few ways to switch things up and make these poppers uniquely yours!
- Flour Swap: Try using half whole wheat flour and half all-purpose flour for a slightly nuttier flavor and extra fiber. Gluten-free all-purpose blends often work well too, but results can vary!
- Dairy-Free? Easily swap the dairy milk for almond milk, oat milk, soy milk, or any non-dairy milk you prefer.
- Butter Alternative: You can substitute the melted butter with an equal amount of melted coconut oil or even a neutral vegetable oil.
- Get Creative with Mix-ins: Beyond the basics, try adding finely chopped nuts, mini M&M’s, sprinkles (add them right before cooking or fold them in gently), a pinch of cinnamon or nutmeg to the batter, or even a little lemon zest!
Tips for Success
- Don’t Overmix! I’m repeating this because it’s the most common pancake mistake. Lumpy batter makes for tender poppers!
- Use the Right Pan: These are designed for a pan with small, round molds. A mini muffin tin, aebleskiver pan, or cake pop maker is essential.
- Don’t Skimp on Greasing: Even if your pan is nonstick, a little butter or cooking spray ensures they pop right out easily.
- Heat Matters: Make sure your pan is preheated properly before adding the batter. Too cool and they’ll be greasy; too hot and they’ll burn on the outside before cooking inside.
- Prep Ahead: You can whisk the dry ingredients together and store them in an airtight container. Mix the wet ingredients in a separate container. Combine just before you’re ready to cook!
How to Store It
Got leftovers? (Highly unlikely, but just in case! 😉)
Let the pancake poppers cool completely. Store them in an airtight container at room temperature for a day or two, or in the refrigerator for up to 3-4 days.
For longer storage, these freeze beautifully! Place cooled poppers in a single layer on a baking sheet and freeze until solid. Then transfer them to a freezer-safe bag or container. They’ll keep in the freezer for up to 2-3 months.
To reheat, you can pop them in the microwave for 30-60 seconds, warm them gently in a toaster oven, or even reheat in an air fryer for a few minutes until warm through.
FAQs
Here are a few common questions I get about these little bites of joy:
Q: What kind of pan do I absolutely need?
A: To get the “popper” shape, you really need a pan with small, rounded cavities like a mini muffin tin, an aebleskiver pan, or a cake pop maker. You can’t make them this shape in a regular flat pancake pan.
Q: Can I make the batter the night before?
A: For the fluffiest results, it’s best to mix the wet and dry ingredients just before cooking. You can definitely measure and combine the dry ingredients ahead of time, and even mix the wet ingredients separately and store them in the fridge. Just combine right before heating the pan!
Q: Are these good for freezing for quick breakfasts?
A: Absolutely! They are perfect for meal prep. Just follow the freezing instructions above. Grab a few from the freezer, reheat, and you’ve got an instant breakfast!
Q: How do you serve these?
A: Just like regular pancakes! Pile them on a plate and serve with syrup for dipping, fresh fruit, whipped cream, yogurt, or anything else you love with your pancakes!
Happy Cooking, friends! I hope you love these Pancake Poppers as much as I do!
PrintEasy & Fun Breakfast Pancake Poppers

Bite-sized, easy, and fun pancake bites perfect for dipping. Simple to make and mess-friendly.
Ingredients
Ingredients
- 2 cups all-purpose flour
- 0.25 cup granulated sugar
- 1 tablespoon baking powder (Make sure yours isn’t expired.)
- 0.5 teaspoon salt
- 1.75 cups milk (Use whole milk, 2%, or non-dairy.)
- 2 large eggs
- 0.25 cup unsalted butter (Melted)
- 1 teaspoon vanilla extract
- 0.5 cup mix-ins (Optional: blueberries, chocolate chips, bananas, or strawberries. Use tiny chopped pieces.)
Instructions
- In a large bowl, whisk together your flour, sugar, baking powder, and salt.
- In a separate, medium bowl, whisk together the milk, eggs, melted butter, and vanilla extract.
- Pour the wet ingredients into the bowl with the dry ingredients. Mix gently with a spatula or wooden spoon until the dry ingredients are moistened. A few lumps are okay.
- If using mix-ins, gently fold them into the batter.
- Lightly grease the wells of your popper pan (mini muffin tin, aebleskiver pan, or cake pop maker) and heat it according to instructions or over medium heat.
- Pour or spoon the batter into the prepared wells, filling them about two-thirds or three-quarters full.
- Cook for a few minutes until edges are set and bubbles form. Carefully flip and cook for another 1-3 minutes until golden brown and cooked through.
- Remove poppers from the pan and serve warm with toppings.
Notes
Don’t overmix the batter; a few lumps are fine. Ensure you use a pan with small, rounded cavities (mini muffin tin, aebleskiver pan, or cake pop maker). Always lightly grease the pan. Make sure the pan is properly preheated. You can whisk dry ingredients and wet ingredients separately ahead of time and combine just before cooking. Store cooled leftovers in an airtight container at room temperature (1-2 days), in the refrigerator (3-4 days), or freeze for up to 2-3 months. Reheat in the microwave, toaster oven, or air fryer. Possible substitutions include using half whole wheat flour, gluten-free flour, non-dairy milk, or melted coconut oil/vegetable oil instead of butter. Get creative with mix-ins like nuts, mini M&M’s, sprinkles, cinnamon, nutmeg, or lemon zest.