Introduction
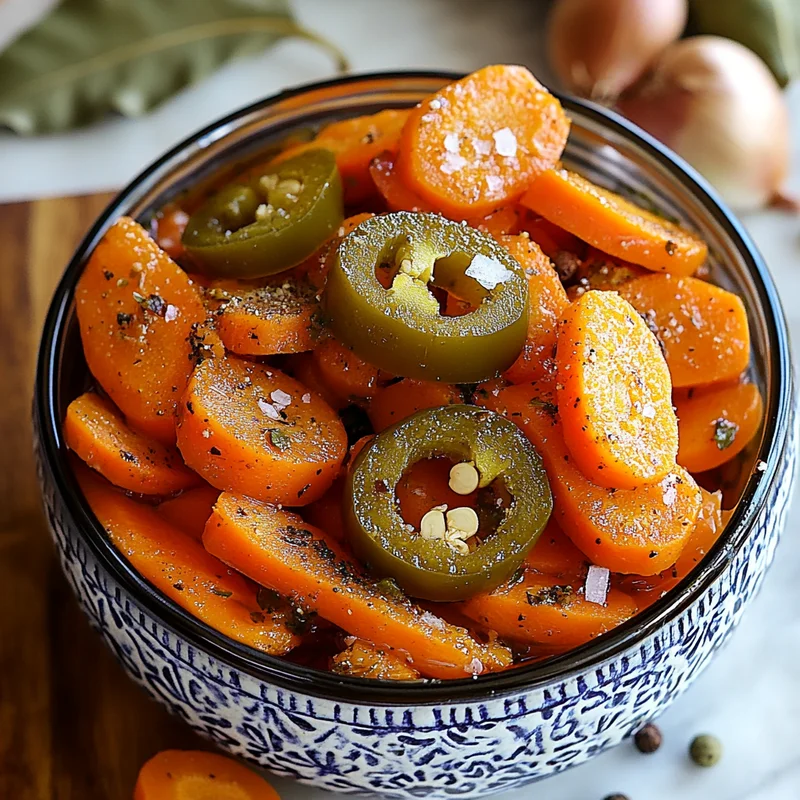
Okay, friend, let me tell you about one of my absolute favorite secret weapons in the kitchen. You know those little bowls of spicy, tangy carrots you sometimes get at your favorite taqueria or authentic Mexican restaurant? The ones you can’t stop munching on before your main dish even arrives? Yep, those carrots! For years, I thought they were some magical, complicated concoction. But guess what? They are SO easy to make at home! Making your own batch of Mexican pickled carrots, or “Curtido de Zanahoria,” is not only incredibly simple, but it brings that vibrant, spicy-tangy goodness right to your own fridge. They are perfect on tacos, alongside grilled meats, or honestly, just eaten straight from the jar. Trust me, once you make these, you’ll keep a batch handy at all times!
Why You’ll Love This Recipe
- Fast: From start to finish, you can have these bubbling away in under 30 minutes. Most of the time is just waiting for the flavors to do their thing!
- Easy: No fancy techniques here! If you can slice a carrot and heat a pot, you can totally nail this recipe.
- Giftable: Pack them into pretty jars, and you’ve got a fantastic homemade gift for any food lover.
- Crowd-Pleasing: These vibrant pickles add a burst of flavor that everyone seems to adore, whether they love spicy food or just appreciate a bright, tangy bite.

Ingredients
Gather ’round, let’s look at the simple stars of our show:
- 1 ½ pounds carrots: The main event! Pick fresh, firm carrots for the best texture.
- 1 small onion, sliced: Adds a lovely savory base to our pickling liquid. Any onion works, but a yellow or white one is classic.
- 3-4 serrano or jalapeño chilies, whole or sliced: Here’s where the heat comes in! Use serranos for more kick, jalapeños for a milder spice. You can slice them for maximum heat dispersal or keep them whole for less intense heat and just a hint of chili flavor.
- 1 ¼ cups vinegar (white or apple cider): This provides the essential tang and helps preserve our goodies. White vinegar is traditional and gives a clean tang, while apple cider adds a subtle fruity note.
- 1 ¼ cups water: Balances out the vinegar perfectly.
- 1 Tablespoon Mexican oregano: Please, pretty please, use Mexican oregano if you can find it! It has a slightly different, more earthy flavor profile than Mediterranean oregano and is key to that authentic taste.
- 3 bay leaves: Adds a wonderful, subtle aromatic depth.
- ½ teaspoon black peppercorns, lightly crushed: Just gives a little peppery punch. Giving them a little crush in your hand or with the back of a spoon helps release their flavor.
- 3 cloves garlic, peeled: Because what’s delicious food without garlic? They infuse the brine beautifully.
- 3 Tablespoons olive oil: Used to sauté the initial veggies and help bloom those flavors.
- 1 teaspoon table salt, or more to taste: Essential for flavor and part of the pickling process. You can always add a tiny pinch more if needed at the end, but start here!
How to Make It
Alright, let’s get cooking! Don’t blink, it’s that simple.
- Prep Your Veggies: First things first, give those carrots a good wash and peel them. Then, slice them up! You can go for rounds (about ¼ inch thick) or sticks – whatever shape you like best for snacking or adding to your meals. Slice that small onion into thin rings or half-moons.
- Heat Things Up: Grab a nice-sized pot or saucepan – one big enough to hold everything comfortably. Pour in the olive oil and place it over medium heat.
- Sauté the Aromatics: Once the oil is warm, toss in your sliced onions and the whole garlic cloves. Give them a stir and cook them gently for about 3-5 minutes. You want them to soften up and release their lovely aromas, but don’t let them brown too much.
- Add the Carrots & Chilies: Now, add your sliced carrots and those chilies (whole or sliced, depending on your heat preference) to the pot. Stir everything around so the carrots get coated in that fragrant oil. Let them cook together for another 5 minutes, stirring occasionally. They should just start to soften ever so slightly but still have a good bite to them.
- Pour in the Liquids: Time for the pickling magic! Carefully pour in the vinegar and water.
- Add the Spices: Now add the flavor powerhouses: the Mexican oregano, bay leaves, those lightly crushed black peppercorns, and the salt. Give everything a good stir to combine.
- Boil and Simmer: Bring the mixture up to a rolling boil. Once it’s bubbling away, reduce the heat to low and let it gently simmer. You only need to simmer it for about 5-10 minutes. The goal here is for the carrots to become “tender-crisp” – soft enough to bite into easily, but still with a pleasant crunch. Keep an eye on them; nobody likes mushy pickled carrots! I usually test a piece around the 5-minute mark.
- Cool Slightly: Once the carrots are just right, take the pot off the heat. Let it sit for a few minutes to cool down a bit before transferring.
- Jar Them Up: Carefully spoon the carrots, onions, garlic, chilies, and all that glorious pickling brine into clean jars or containers. Make sure everything is submerged in the liquid.
- Cool Completely: This is important! Leave the jars uncovered (or just loosely covered) until they’ve cooled completely to room temperature. Once cool, seal them tightly with lids.
- Chill & Wait (the hardest part!): Pop those sealed jars into the refrigerator. While they are technically edible right away, they taste SO much better after chilling for at least 24 hours. This time allows all those beautiful flavors to meld and deepen. Seriously, try to wait!
Substitutions & Additions
Feel free to play around and make this recipe your own!
- Other Veggies: This brine is fantastic for pickling other hardy vegetables like cauliflower florets, jicama sticks, or even radish slices. You could do a mix!
- Different Peppers: Want less heat? Use fewer chilies or remove the seeds before adding. Want more heat? Try a habanero (carefully!) or use more serranos. Poblano peppers would add a smoky, milder flavor.
- Vinegar Swap: While white or apple cider is classic, you could experiment with a mix of vinegars, but keep the total liquid amount the same. Just avoid anything too strongly flavored like balsamic.
- Extra Flavor Boosts: A pinch of cumin seeds, a few coriander seeds, or even a sprig of thyme could add interesting layers of flavor to the brine.
Tips for Success
A couple of pointers to make sure your pickled carrots are perfect every time:
- Don’t Overcook: The biggest mistake is cooking the carrots too long in the brine. They should be tender-crisp, not soft. Remember, they’ll continue to soften a tiny bit as they sit in the hot brine off the heat.
- Clean Jars are Key: While this isn’t a traditional canning recipe meant for shelf stability outside the fridge, using clean jars helps ensure your pickles stay fresh longer in the refrigerator.
- Wait for Flavor: I know I said it before, but seriously, waiting that 24 hours makes a world of difference in flavor development. If you can wait 48 hours, even better!
- Prep Ahead: You can absolutely make a big batch of these on the weekend to enjoy all week long. They actually get better with time (up to a point!).
How to Store It
Store your cooled and sealed jars of Mexican pickled carrots in the refrigerator. Because this is a quick pickle and not a traditional canning method for shelf-stable storage, they must be kept cold. They will last happily in the fridge for about 2-3 weeks. Honestly though, mine rarely last that long!
FAQs
Got questions? I’ve got some quick answers!
Q: Are these very spicy?
A: The spice level depends on how many chilies you use and whether you slice them or leave them whole. Using 3-4 whole jalapeños will give you a mild warmth, while slicing serranos will make them much spicier. You can easily customize the heat!
Q: How long do they need to pickle before eating?
A: While technically edible once cooled, they are best after at least 24 hours in the refrigerator to allow the flavors to meld.
Q: Can I use baby carrots?
A: You can, but their texture might be a little different and they cook faster. If using baby carrots, reduce the simmering time significantly, perhaps to just 2-3 minutes, and test for tender-crispness.
Q: What do you eat them with?
A: Oh, everything! Tacos, burritos, quesadillas, alongside grilled chicken or fish, on salads, in grain bowls, or just as a spicy, tangy snack straight from the jar!
Easy & Delicious Mexican Pickled Carrots (Curtido de Zanahoria)
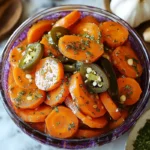
Make your own batch of Mexican pickled carrots, or “Curtido de Zanahoria,” at home. This recipe is incredibly simple, fast, and brings a vibrant, spicy-tangy goodness right to your own fridge. Perfect on tacos, alongside grilled meats, or eaten straight from the jar.
- Prep Time: 10 minutes
- Cook Time: 10 minutes
- Total Time: 20 minutes
Ingredients
Hauptzutaten
- 1.5 pounds carrots (The main event! Pick fresh, firm carrots for the best texture.)
- 1 small onion (sliced, Adds a lovely savory base to our pickling liquid. Any onion works, but a yellow or white one is classic.)
- 3 -4 serrano or jalapeño chilies (whole or sliced, Use serranos for more kick, jalapeños for a milder spice. You can slice them for maximum heat dispersal or keep them whole for less intense heat and just a hint of chili flavor.)
- 1.25 cups vinegar (white or apple cider, This provides the essential tang and helps preserve our goodies. White vinegar is traditional and gives a clean tang, while apple cider adds a subtle fruity note.)
- 1.25 cups water (Balances out the vinegar perfectly.)
- 1 Tablespoon Mexican oregano (Please, pretty please, use Mexican oregano if you can find it! It has a slightly different, more earthy flavor profile than Mediterranean oregano and is key to that authentic taste.)
- 3 bay leaves (Adds a wonderful, subtle aromatic depth.)
- 0.5 teaspoon black peppercorns (lightly crushed, Just gives a little peppery punch. Giving them a little crush in your hand or with the back of a spoon helps release their flavor.)
- 3 garlic cloves (peeled, Because what’s delicious food without garlic? They infuse the brine beautifully.)
- 3 Tablespoons olive oil (Used to sauté the initial veggies and help bloom those flavors.)
- 1 teaspoon table salt (or more to taste, Essential for flavor and part of the pickling process. You can always add a tiny pinch more if needed at the end, but start here!)
Instructions
- Prep Your Veggies: First things first, give those carrots a good wash and peel them. Then, slice them up! You can go for rounds (about ¼ inch thick) or sticks – whatever shape you like best for snacking or adding to your meals. Slice that small onion into thin rings or half-moons.
- Heat Things Up: Grab a nice-sized pot or saucepan – one big enough to hold everything comfortably. Pour in the olive oil and place it over medium heat.
- Sauté the Aromatics: Once the oil is warm, toss in your sliced onions and the whole garlic cloves. Give them a stir and cook them gently for about 3-5 minutes. You want them to soften up and release their lovely aromas, but don’t let them brown too much.
- Add the Carrots & Chilies: Now, add your sliced carrots and those chilies (whole or sliced, depending on your heat preference) to the pot. Stir everything around so the carrots get coated in that fragrant oil. Let them cook together for another 5 minutes, stirring occasionally. They should just start to soften ever so slightly but still have a good bite to them.
- Pour in the Liquids: Time for the pickling magic! Carefully pour in the vinegar and water.
- Add the Spices: Now add the flavor powerhouses: the Mexican oregano, bay leaves, those lightly crushed black peppercorns, and the salt. Give everything a good stir to combine.
- Boil and Simmer: Bring the mixture up to a rolling boil. Once it’s bubbling away, reduce the heat to low and let it gently simmer. You only need to simmer it for about 5-10 minutes. The goal here is for the carrots to become “tender-crisp” – soft enough to bite into easily, but still with a pleasant crunch. Keep an eye on them; nobody likes mushy pickled carrots! I usually test a piece around the 5-minute mark.
- Cool Slightly: Once the carrots are just right, take the pot off the heat. Let it sit for a few minutes to cool down a bit before transferring.
- Jar Them Up: Carefully spoon the carrots, onions, garlic, chilies, and all that glorious pickling brine into clean jars or containers. Make sure everything is submerged in the liquid.
- Cool Completely: This is important! Leave the jars uncovered (or just loosely covered) until they’ve cooled completely to room temperature. Once cool, seal them tightly with lids.
- Chill & Wait (the hardest part!): Pop those sealed jars into the refrigerator. While they are technically edible right away, they taste SO much better after chilling for at least 24 hours. This time allows all those beautiful flavors to meld and deepen. Seriously, try to wait!
Notes
Store your cooled and sealed jars of Mexican pickled carrots in the refrigerator. Because this is a quick pickle and not a traditional canning method for shelf-stable storage, they must be kept cold. They will last happily in the fridge for about 2-3 weeks. Don’t Overcook: The biggest mistake is cooking the carrots too long in the brine. They should be tender-crisp, not soft. Clean Jars are Key: Using clean jars helps ensure your pickles stay fresh longer in the refrigerator. Wait for Flavor: waiting that 24 hours makes a world of difference in flavor development. If you can wait 48 hours, even better! Prep Ahead: You can absolutely make a big batch of these on the weekend to enjoy all week long. They actually get better with time (up to a point!). The spice level is customizable depending on the number and preparation of chilies. While technically edible once cooled, they are best after at least 24 hours in the refrigerator. You can use baby carrots but adjust the simmering time significantly (perhaps to just 2-3 minutes). Serve with tacos, burritos, quesadillas, alongside grilled chicken or fish, on salads, in grain bowls, or just as a spicy, tangy snack straight from the jar!