Introduction
Hey there, sweet friend! Let’s talk about jam. Is there anything better than cracking open a jar of homemade goodness, especially when it’s bursting with the flavor of fresh blueberries and a hint of warm vanilla? For me, homemade jam is pure magic. It’s a little bit of sunshine preserved, a sweet reminder of lazy summer days or cozy mornings curled up with toast. And guess what? Making your own delicious jam isn’t some complicated kitchen project reserved for grandmas (though they certainly perfected it!). It’s surprisingly simple, quick, and incredibly rewarding. This Blueberry Vanilla Jam recipe? It’s so easy, you’ll wonder why you ever bought jam from the store!
Why You’ll Love This Recipe
- Fast: Seriously, you can have this bubbling away and in jars in under 30 minutes (plus cooling time!).
- Easy: No complicated steps or fancy equipment needed. If you can stir, you can make this jam!
- Giftable: Pour this gorgeous purple-blue jam into pretty jars, tie a ribbon, and you’ve got the most thoughtful homemade gift.
- Crowd-pleasing: Who doesn’t love classic blueberry jam? The vanilla adds a little something extra special that everyone will adore.

Ingredients
Gather your simple ingredients. You likely have most of these on hand already!
- 1 kg (about 6 cups) Blueberries: Fresh or frozen work beautifully here. If using frozen, don’t thaw them first – just toss them right in!
- 500 g (about 2 1/2 cups) Preserving Sugar: This sugar is specifically designed for jam-making and contains pectin, which helps your jam set up nicely. If you don’t have preserving sugar, you can use regular granulated sugar, but you might need to add a little powdered pectin according to package directions to get a good set.
- 1 Vanilla Pod: That lovely speckle of vanilla seeds adds such a warm, comforting layer of flavor. You’ll split it lengthwise and scrape out those tiny black seeds.
- Juice of 1/2 Lemon: This isn’t just for flavor! The acidity from the lemon helps with the setting process and also brightens up the sweet berry taste.
How to Make It
Alright, let’s get cooking! It’s just a few simple steps to jam perfection.
- Prep Your Berries: Give your beautiful blueberries a good wash under cool water. Let them drain a bit. Pop them into a large, heavy-bottomed pot. A heavy pot helps distribute heat evenly and prevents scorching.
- Add the Sweetness & Spice: Now, add the preserving sugar over the blueberries. Take your vanilla pod, slice it down the middle lengthwise, and use the back of a knife or a spoon to scrape out all those fragrant little seeds. Add the seeds to the pot. Squeeze in the juice from half a lemon.
- Dissolve the Sugar: Place the pot over medium heat. Stir gently but continuously until all the sugar has completely dissolved. You won’t feel any grittiness on the bottom of the pot when you stir. This step is important to prevent sugar crystals later!
- Bring to a Boil & Simmer: Turn up the heat and bring the mixture to a rolling boil. This is a boil that doesn’t stop even when you stir. Once it’s boiling vigorously, let it boil for exactly 5 minutes without a lid. Keep an eye on it – it can bubble up quickly!
- Cool Slightly: Remove the pot from the heat. Let the jam sit for about 10-15 minutes, giving it an occasional stir. This brief resting period helps the fruit distribute throughout the jam and cool slightly before jarring.
- Skim the Foam: You might notice some foamy bubbles on the surface. Use a spoon to gently skim this foam off. Removing it gives you a clearer, prettier jam.
- Jar It Up! While the jam is cooling slightly, make sure you have some clean, warm jars ready. You can sterilize them by washing them in hot soapy water, rinsing, and then heating them in an oven at 275°F (135°C) for 10 minutes, or running them through a hot dishwasher cycle. Carefully ladle the hot jam into the warm jars, leaving about a 1/2 inch of headspace (space between the jam and the rim). Wipe the rims clean with a damp cloth, place the lids on, and screw the bands finger-tight.
- Cool Completely: Let the jars cool undisturbed on your counter. As they cool, you’ll likely hear the lids “pop” – that’s the sound of a good seal! Once they are completely cool, label them.
Substitutions & Additions
Want to get creative? Here are a few ideas to change things up:
- Mixed Berries: Swap out some of the blueberries for raspberries, blackberries, or even sliced strawberries.
- Other Extracts: Instead of vanilla bean, you could stir in a teaspoon of pure vanilla extract after you’ve removed the jam from the heat. Almond extract would also be lovely!
- Add Spices: A pinch of cinnamon, a star anise (remove before jarring!), or a couple of cardamom pods added during the boiling step can add warmth and complexity.
- A Splash of Booze: For an adult twist, stir in a tablespoon or two of bourbon, rum, or cassis liqueur after boiling and removing from the heat.
Tips for Success
Keep these little pointers in mind for the best batch of jam:
- Use a Big Pot: Jam bubbles up quite a bit! Make sure your pot is large enough to handle the boil without overflowing.
- Don’t Skip the Stirring: Especially in the beginning, stirring helps dissolve the sugar evenly and prevents the fruit from sticking and burning on the bottom.
- Get Your Jars Ready: Have your clean, warm jars and lids prepped before the jam is finished cooking. Jam sets as it cools, so you want to get it into the jars quickly once it’s ready.
- Clean Rims are Key: Make sure the rim of the jar is perfectly clean before putting the lid on. Even a tiny bit of jam or sugar can prevent a good seal.
How to Store It
This recipe, as written with the simple jarring method, is perfect for refrigerator storage. Once the jars are completely cool, store them in the fridge. Properly sealed jars (you’ll hear that pop!) will last for several months in the refrigerator. If you’re interested in shelf-stable canning, you’ll need to follow tested water bath canning procedures, which involves processing the filled jars in boiling water for a specific amount of time (usually 10 minutes for jam at sea level) – but this recipe is designed for quick, easy fridge jam!
FAQs
Got questions? Let’s tackle a couple!
Q: What is preserving sugar? Can I use regular sugar?
A: Preserving sugar is granulated sugar that has pectin and sometimes citric acid added to it. Pectin is a natural gelling agent found in fruit, and the added pectin helps ensure your jam sets without needing to add it separately. You can use regular granulated sugar, but you may need to add commercial pectin following the pectin package’s instructions for fruit jams.
Q: Why do you add lemon juice?
A: Lemon juice contains pectin and acid. The acid helps the pectin in the fruit (and preserving sugar) form a gel, which is what makes jam set up. It also brightens the flavor of the berries and helps preserve the jam’s color.
Q: How do I know if my jam will set?
A: The preserving sugar and the 5-minute boil should give you a good set. A simple test is the “cold plate test”: Put a small plate in the freezer before you start. When you think the jam is ready, spoon a little bit onto the cold plate. Let it sit for a minute, then push it gently with your finger. If it wrinkles or gels, it’s ready! If it’s still very runny, you could boil it for another minute or two (carefully!), but be mindful of overcooking.
Q: How long does this jam last in the fridge?
A: When stored in the refrigerator in clean, sealed jars, this jam should last for several months. Once opened, consume within 2-3 weeks for best quality.
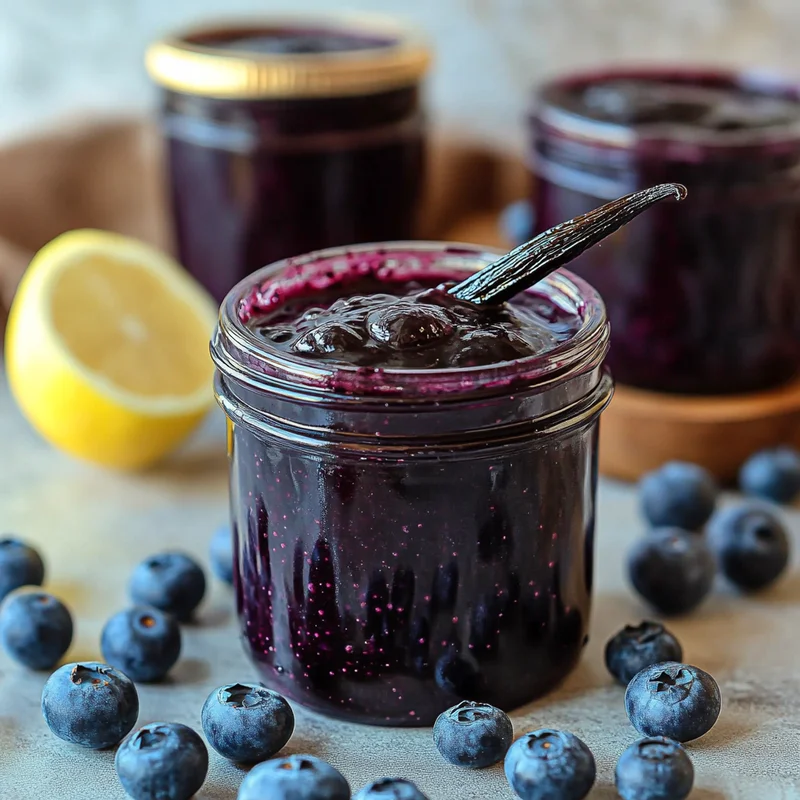
Easy Homemade Blueberry Vanilla Jam
Let’s talk about jam. Is there anything better than cracking open a jar of homemade goodness, especially when it’s bursting with the flavor of fresh blueberries and a hint of warm vanilla? For me, homemade jam is pure magic. It’s a little bit of sunshine preserved, a sweet reminder of lazy summer days or cozy mornings curled up with toast. And guess what? Making your own delicious jam isn’t some complicated kitchen project reserved for grandmas (though they certainly perfected it!). It’s surprisingly simple, quick, and incredibly rewarding. This Blueberry Vanilla Jam recipe? It’s so easy, you’ll wonder why you ever bought jam from the store!
- Prep Time: 10 minutes
- Cook Time: 10 minutes
- Total Time: 20 minutes
Ingredients
Hauptzutaten
- 1000 g Blueberries (Fresh or frozen work beautifully here. If using frozen, don’t thaw them first – just toss them right in! (about 6 cups))
- 500 g Preserving Sugar (specifically designed for jam-making and contains pectin, which helps your jam set up nicely. If you don’t have preserving sugar, you can use regular granulated sugar, but you might need to add a little powdered pectin according to package directions to get a good set. (about 2 1/2 cups))
- 1 Vanilla Pod (split it lengthwise and scrape out those tiny black seeds)
- 0.5 Lemon Juice (Juice of 1/2 Lemon)
Instructions
- Prep Your Berries: Give your beautiful blueberries a good wash under cool water. Let them drain a bit. Pop them into a large, heavy-bottomed pot.
- Add the Sweetness & Spice: Now, add the preserving sugar over the blueberries. Take your vanilla pod, slice it down the middle lengthwise, and use the back of a knife or a spoon to scrape out all those fragrant little seeds. Add the seeds to the pot. Squeeze in the juice from half a lemon.
- Dissolve the Sugar: Place the pot over medium heat. Stir gently but continuously until all the sugar has completely dissolved. You won’t feel any grittiness on the bottom of the pot when you stir. This step is important to prevent sugar crystals later!
- Bring to a Boil & Simmer: Turn up the heat and bring the mixture to a rolling boil. This is a boil that doesn’t stop even when you stir. Once it’s boiling vigorously, let it boil for exactly 5 minutes without a lid. Keep an eye on it – it can bubble up quickly!
- Cool Slightly: Remove the pot from the heat. Let the jam sit for about 10-15 minutes, giving it an occasional stir. This brief resting period helps the fruit distribute throughout the jam and cool slightly before jarring.
- Skim the Foam: You might notice some foamy bubbles on the surface. Use a spoon to gently skim this foam off. Removing it gives you a clearer, prettier jam.
- Jar It Up! While the jam is cooling slightly, make sure you have some clean, warm jars ready. You can sterilize them by washing them in hot soapy water, rinsing, and then heating them in an oven at 275°F (135°C) for 10 minutes, or running them through a hot dishwasher cycle. Carefully ladle the hot jam into the warm jars, leaving about a 1/2 inch of headspace (space between the jam and the rim). Wipe the rims clean with a damp cloth, place the lids on, and screw the bands finger-tight.
- Cool Completely: Let the jars cool undisturbed on your counter. As they cool, you’ll likely hear the lids “pop” – that’s the sound of a good seal! Once they are completely cool, label them.
Notes
This recipe is designed for refrigerator storage. Store completely cool, sealed jars in the fridge for several months. Once opened, consume within 2-3 weeks for best quality. For shelf-stable canning, follow tested water bath canning procedures (not detailed in this recipe).